Connecting Somfy blinds to Alexa with a Raspberry Pi
I thought it would be nice to be able to control the blinds using Alexa, but unfortunately my blinds are too old and not readily compatible with Alexa.
In this article I will show how I used a Raspberry Pi together with a CC1101 433 MHz transmitter module to emulate the remote of my dumb blinds, and integrate it with Alexa so I can open and close the blinds using voice commands.
In a previous article, I analyzed the 433 MHz signal emitted by the remote of my Somfy blinds, and built a synthetic version of the signal I could replay using HackRF. We'll use that knowledge here.
Overview of the setup
We're going to have a Raspberry Pi connected to the internet, with a CC1101 module attached to it, which will give it the ability to transmit 433 MHz signals.
On the other hand, we'll configure Alexa to communicate with the Raspberry Pi over the internet when it receives voice commands for opening and closing the blinds.
For the communication part, we'll set up a tiny web server which both Alexa and the Raspberry Pi will connect to. This web server needs to be publicly accessible from the Internet, so Alexa can reach it. We'll use an Alexa plugin called URL Switch which someone already implemented: with this, we can easily configure Alexa to send a POST request to a URL on our web server on specific voice commands.
This is what the entire setup looks like:
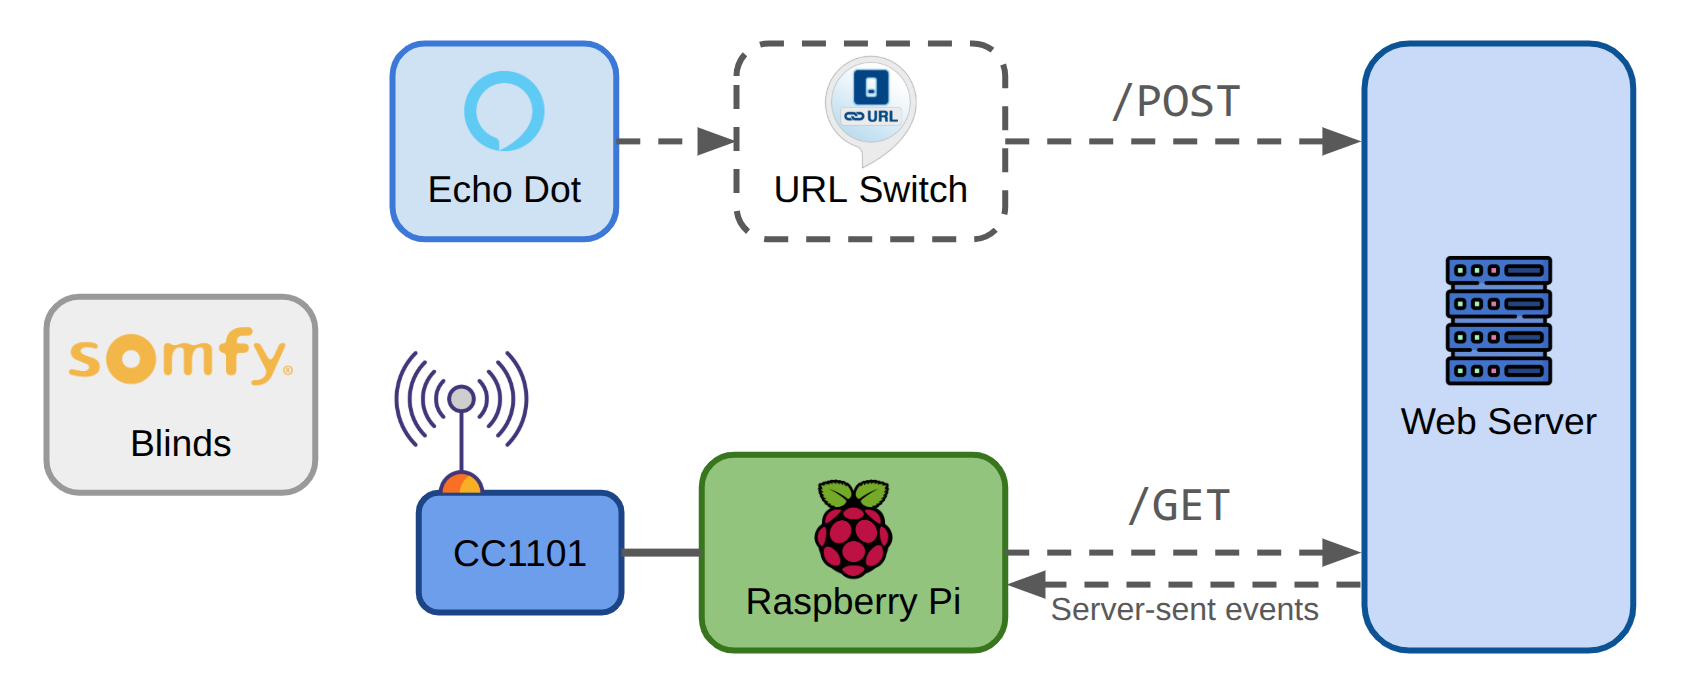
You may be wondering: why can't URL Switch talk to the Raspberry Pi directly? In other words, why can't the Raspberry Pi be a Web Server itself? That would be a valid design, and probably simpler too. However, in my particular setup, the Raspberry Pi is behind a router which I don't control, and I am unable to open/redirect ports as needed to publicly expose a Web Server.
Hardware needed
This is the full list of hardware I used for this project:
- Raspberry Pi: I used a Raspberry Pi Model 3 B which I had lying around, but any model would work.
- SD Card: needed for storage by the Raspberry Pi. I got a cheap 128 GB one from Amazon.
- CC1101 module: I bought it from AliExpress for ~$4 (shipping included).
- Breadboard cables (female-female): easiest way of connecting the Raspberry Pi to the CC1101 module.
Connecting the Raspberry Pi to the C1101 module
The CC1101 module uses SPI for communication, and it needs to connect to the corresponding SPI pins of the Raspberry Pi. No matter which version you have, they all have the same 40-pin layout.
This is how I made the connections:
| CC1101 Pin | CC1101 Signal | Raspberry Pi Pin | Raspberry Pi Signal |
|---|---|---|---|
| Pin 1 | GND | Pin 20 | GND |
| Pin 2 | VCC (1.8V - 3.6V) | Pin 17 | 3v3 Power |
| Pin 3 | GDO0 | Pin 18 | GPIO 24 |
| Pin 4 | CSN | Pin 24 | GPIO 8 / SMI SD0 |
| Pin 5 | SCK | Pin 23 | GPIO 11 / SMI SD3 |
| Pin 6 | MOSI | Pin 19 | GPIO 10 / SMI SD2 |
| Pin 7 | MISO / GDO1 | Pin 21 | GPIO 9 / SPI0 MISO |
| Pin 8 | GDO2 | Pin 22 | GPIO 25 |
I've seen 2 slightly different versions of the CC1101 module, one with 8 pins and one with 10 pins. They're almost the same, the 10-pin one just has duplicate VCC and GND. Mine is like this one and it has 8 pins:
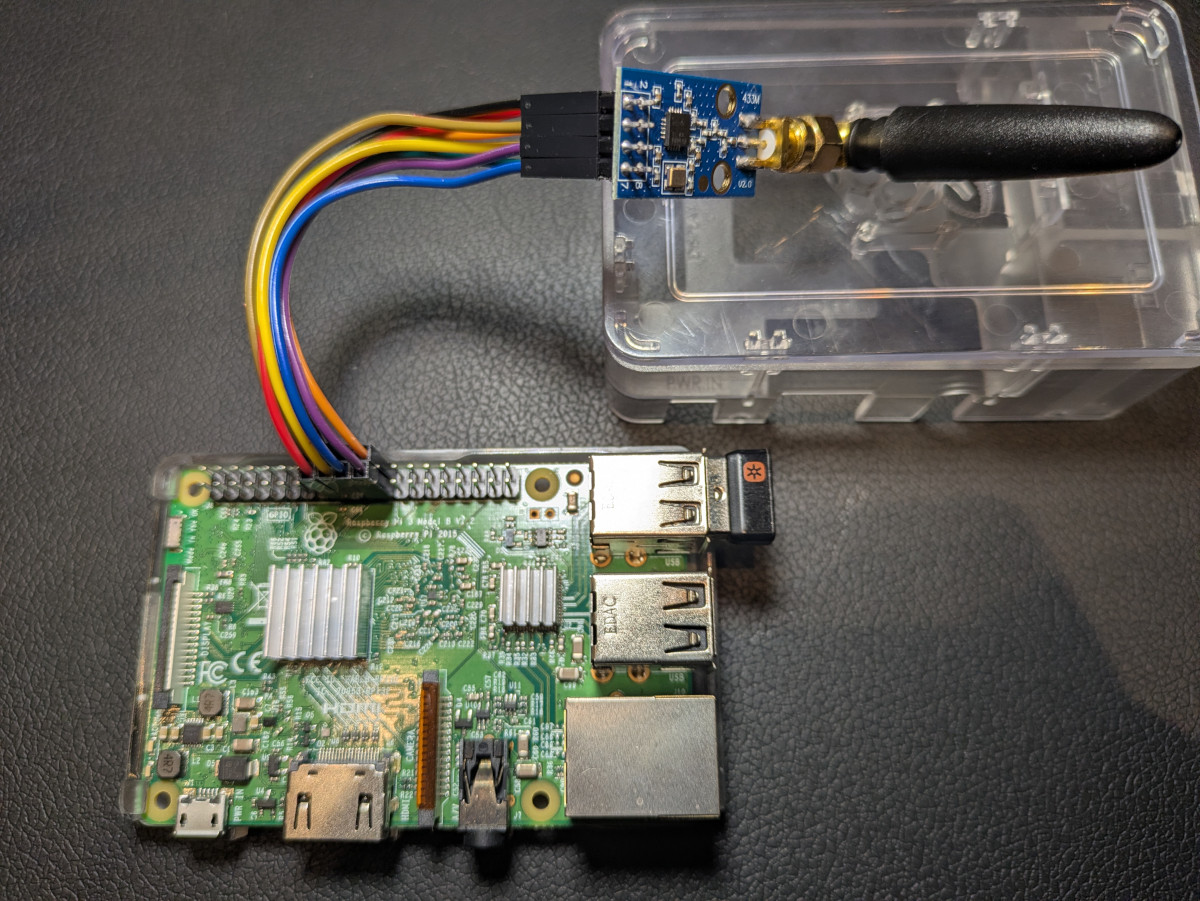
This is what the connection ended up looking like:
Transmitting the RF signal using Python
After some research of different options in C/C++ and Python, I ended up using a library appropriately called python-cc1101. It worked great, except for the very annoying fact that there isn't a clean way of waiting for a transmission to finish before starting another one. As a workaround, I implemented a hacky method that waits for "idle" status.
This is how I put it together:
import cc1101
import time

frequency = 433410000 # 433.410 Mhz
pulse_duration = 642e-6
baud_rate = 1 / pulse_duration
transmit_power = 56
repeat = 5
pause = 0.02 # 20 ms

def wait_for_idle(transceiver):
    while True:
        try:
            state = transceiver.get_main_radio_control_state_machine_state()
        except ValueError:
            continue

        if state == cc1101.MainRadioControlStateMachineState.IDLE:
            break


def transmit_data(data: bytes):
    with cc1101.CC1101() as transceiver:
        transceiver.set_base_frequency_hertz(frequency)
        transceiver.set_symbol_rate_baud(baud_rate)
        transceiver.set_sync_mode(cc1101.SyncMode.NO_PREAMBLE_AND_SYNC_WORD)
        transceiver.set_packet_length_mode(cc1101.PacketLengthMode.FIXED)
        transceiver.set_packet_length_bytes(4)
        transceiver.disable_checksum()
        transceiver.set_output_power((0, transmit_power))
        transceiver.set_packet_length_bytes(len(data))

        for _ in range(repeat):
            transceiver.transmit(data)
            wait_for_idle(transceiver)
            time.sleep(pause)
Triggering the transmission from server-sent events
Continuation of the previous script, but now we add logic for listening to SSE from our Web Server:
import time
import logging
import requests
import sseclient

events_url = "https://example.com/my-sse-endpoint"

preamble = [
  1,1,1,1,0,0,0,0,
  1,1,1,1,0,0,0,0,
  1,1,1,1,0,0,0,0,
  1,1,1,1,0,0,0,0,
  1,1,1,1,0,0,0,0,
  1,1,1,1,0,0,0,0,
  1,1,1,1,0,0,0,0,
  1,1,1,1,1,1,1,1,
]
payload_up = [...]
payload_down = [...]

data_up = preamble + payload_up
data_down = preamble + payload_down

event_data = {
    'blinds-up': data_up,
    'blinds-down': data_down,
}

while True:
  try:
    with requests.get(events_url, stream=True, timeout=30) as r:
      client = sseclient.SSEClient(r)
      for event in client.events():
        name = event.event
        bits = event_data.get(name)
        if bits is not None:
            logging.info(f"Event: {name}")
            data = bits_to_bytes(bits)
            transmit_data(data)
  except Exception as e:
    logging.error(f"Error: {e}")
    time.sleep(1)
You may download the full script here: blinds-daemon.py
Setting up the Web Server
I created a simple web server using NextJS. In particular, I created 2 routes:
- /submit-action (POST): called by URL Switch.
- /my-sse-endpoint (GET): called by the Raspberry Pi. This is a stream of events.
When the first endpoint gets called, the second one will publish a new event immediately. There are many ways of doing this and I won't go into detail.
Configuring URL Switch
URL Switch is easy peasy to set up. You have to enable the plugin from the Alexa app, and then create a virtual lightbulb that connects to your URL. Just follow the instructions on the website.